Christopher Kimball’s Milk Street Television
Greek Meze
9/10/2022 | 26m 46sVideo has Closed Captions
We head to Crete to learn classic Greek dishes, perfect for any meze spread.
We head to Crete to learn some classic Greek dishes. First, Chris and Milk Street Cook Lynn Clark make Greek Meatballs with Tomato Sauce (Soutzoukakia), a perfect addition to any meze spread. Then, Milk Street Cook Sam Fore demonstrates Greek-Style Baked White Beans in Tomato Sauce. Finally, Milk Street cook Bianca Borges prepares Greek Baked Vegetables, garnished with feta and olive oil.
Problems with Closed Captions? Closed Captioning Feedback
Problems with Closed Captions? Closed Captioning Feedback
Christopher Kimball’s Milk Street Television is presented by your local public television station.
Distributed nationally by American Public Television
Christopher Kimball’s Milk Street Television
Greek Meze
9/10/2022 | 26m 46sVideo has Closed Captions
We head to Crete to learn some classic Greek dishes. First, Chris and Milk Street Cook Lynn Clark make Greek Meatballs with Tomato Sauce (Soutzoukakia), a perfect addition to any meze spread. Then, Milk Street Cook Sam Fore demonstrates Greek-Style Baked White Beans in Tomato Sauce. Finally, Milk Street cook Bianca Borges prepares Greek Baked Vegetables, garnished with feta and olive oil.
Problems with Closed Captions? Closed Captioning Feedback
How to Watch Christopher Kimball’s Milk Street Television
Christopher Kimball’s Milk Street Television is available to stream on pbs.org and the free PBS App, available on iPhone, Apple TV, Android TV, Android smartphones, Amazon Fire TV, Amazon Fire Tablet, Roku, Samsung Smart TV, and Vizio.
Providing Support for PBS.org
Learn Moreabout PBS online sponsorship- We've just arrived at Manousakis Winery, just outside Chania.
We've come here to talk about what they cook, the recipes, it's just stunning.
♪ ♪ ♪ ♪ ♪ ♪ - This week on Milk Street, Marianna Leivaditaki, author of Aegean, invites us to Crete and we visit the Manousakis Winery.
And then we're taught two really simple dishes that we loved: meatballs in tomato sauce, as well as baked white beans.
And then we prepare a classic olive-oil-drenched summer dish from Greece-- baked vegetables.
Please stay tuned.
- Funding for this series was provided by the following.
- That meal.
You sautéed, you seared, and you served, cooking with All-Clad, bonded cookware designed, engineered, and assembled in the U.S.A. for over 50 years.
All-Clad: for all your kitchen adventures.
♪ ♪ - Hi, how are you, Alexandra?
- How are you?
- Lovely to meet you... finally.
- This is my husband, Afshin.
- Hi, how are you?
Nice to meet you.
- We have a lot to say about food.
- Okay.
- This menu that we created is an invitation to a real home.
This is not a fancy meal, nor an ancient meal, nor old ladies in the village cooking it kind of meal.
This is how we would cook if you came to our house.
- Yes.
- So, yes, we would have a spaghetti with mince meat in our house, because that's what the kids love to eat, yeah.
(laughter) - So my aunt claims that she makes the best soutzoukakia, that's what that is.
We have her recipe with us.
We're very sentimental people.
I think that's important to know, and we like to cherish that, and we like to promote it, and, and we're very into our roots.
It is truly the essence of, of what we're all doing here.
(rainfall pattering) ♪ ♪ - So, before we make Greek meatballs, I have a story.
- Of course.
- I was in Turkey recently, and they make, essentially, Greek meatballs.
Now, don't get mad because I didn't invent this term, they're called "ladies' thighs."
I'm not making that up.
And they make two kinds, just like this, and the other kind they sort of squash down so they're a little wider.
So this recipe came from the West Coast, the Aegean Coast, when it was a small Greek community, but now it's also part of the Turkish repertoire.
- Thank you for that history lesson.
So we're calling these meatballs, but they're actually more oblong-shaped.
I think we call them cigar-shaped.
They kind of almost look to me like an American football.
- Okay.
- But they're really amazing.
They're cooked in this tomato sauce made with fresh tomatoes.
And we're kind of going to start there.
I'm going to work on the tomatoes.
Going to have you work on the onion that's going to go into the meatballs.
We're also going to grate another onion that's going to go into the sauce.
- You've given me the world's sharpest grater and giving me something difficult to grate.
- Well, I know you always have something to say when we use a grater instead of a knife, but I'm going to tell you why we're doing that.
- Okay.
- So when you make a fresh tomato sauce, you have to concern yourself with the skins, right?
Either have to be completely okay with having skins in your sauce, or you have to like blanch the tomato, then shock it, then peel the tomato, then chop it.
It's a whole big thing.
This is a great way to get fresh tomato sauce.
- Was that a pun?
- (laughs) Grate.
- Grate.
- This is a great way to get fresh tomato sauce and not have to worry about the skins, because skins are left behind when you grate.
- Okay.
- So you get going on your onion grating.
And that part is going to go into the meatball itself.
We're going to make a panade, as we often do with meatballs, by using some panko breadcrumbs, and the juice from that onion is going to soften that panko for the panade.
Grating is also really good for tomatoes that are overripe.
Maybe they're a little too soft.
- Really?
- Yeah, you can still grate them, so they still have really good, sweet flavor, but you don't have to worry too much about the texture.
- Of course, I got the onions, so I'm about to start crying any moment now.
We're getting down to the nub here.
- Don't worry about leaving something behind here.
- That's what I'm leaving.
A little panko here.
- So add the panko bread crumbs, and then a half a teaspoon of salt.
And then just mix that together, and that's going to be a nice panade for inside the meatballs.
We'll grate the other onion for the sauce a little bit later.
- So the panade concept is bread of some kind and liquid, and that makes it more tender.
- Right.
- And if you overcook them... - Yeah, it's sort of an insurance policy against kind of tough, hard meatballs.
And in this case, you know, the liquid is just the onion juice.
So that's going to sit for about ten minutes, and I'm going to finish these tomatoes, and then we'll come back and mix together the meatballs.
Okay.
(accented): The meatballs.
- I'm suddenly Italiano!
All right, so this has sat for ten minutes.
We can move on with making the meatballs.
I'm going to have you chop up some of our fresh herbs.
This has fresh herbs and some ground spices in it.
You've got mint and parsley, if you would start chopping that up.
I'm going to talk a little bit about what we're going to use for meat.
We're using two different types of meat.
We're using ground lamb and ground beef.
If you want to use one or the other that's fine.
We really like this combination.
There's a little bit of that gaminess from the ground lamb, which is really nice in here.
Plus it's just really more traditional to use ground lamb.
Good job on the chopping over there.
- Yeah.
- All right, I'm going to add an egg, a little bit of garlic, some sweet paprika, cumin, oregano, and then a little bit of black pepper.
We've already got some salt in there from that panade.
Then if you would throw those in here.
This is about two tablespoons of each.
We're winging it, though.
Then best way to mix a meatball is with your hands.
Got to get dirty if you're going to cook.
Your hands are your best tool.
- Yeah, well, it's true.
- All right, so you can see this is pretty loose.
That's great for the texture of the meatballs, but right now we can't really form them because it's a little too soft.
So I'm just going to pop it into the refrigerator for about 15 minutes just to firm up.
- Okay.
- So the meat mixture has sat in the refrigerator for about 15 minutes.
It's a little bit more firm so we can form our meatballs now.
You said you didn't mind getting dirty, so... - It's okay.
- So a quarter cup.
If it gets a little too sticky, which it probably will, just dip your hands in the water.
We're going for kind of an oblong football shape.
We call them cigars.
- I would say mine look a little better than yours, if I were... - You might be right.
You might be right.
All right, so let's go wash our hands, and then we can fry these up.
- Okay.
- So I have three tablespoons of oil in the pan that's been heating up.
It looks pretty good.
Now we're going to add the meatballs.
We're going to fry these in the pan first, then take them out, build our sauce, and then add them back in and put it in the oven.
So we want to get a little bit of browning on these meatballs first.
Want these guys in nice and hot.
Which is great.
So they're still pretty delicate, so you want to be pretty careful with them.
And then when we flip them over, I'm going to show you a little technique to flip them so that they don't fall apart.
- You're not worried about crowding the pan?
- That's a good point.
You do want to make sure the oil is nice and hot before you add these, because otherwise they will steam rather than brown.
So we're going to let these brown for probably three minutes or so and then flip 'em around.
And I'm going to use two spoons to flip them over.
You could also use a thin metal spatula, like a fish spatula, or if you have like a cake spatula, something that's really thin.
Because they're so delicate, you want to make sure that when you flip them, they don't completely fall apart.
So we'll let these cook for just a few more minutes, and then I'll show you how to flip them.
All right, these look ready to flip, so I'm going to use the spoons to just kind of gently roll them over.
Look at that.
That looks great.
Very gentle with these guys.
Kind of roll it into the bowl of the spoon.
All right, we'll let these finish cooking on the other side, then I'm going to take them out, drain all of that fat, and then we'll build the sauce.
All right, Chris, all the meatballs are out.
We can start building the sauce.
I'm going to add just a little bit of oil.
To that we'll add those onions that we grated.... And a little bit of garlic... Salt... Little bit of pepper...
So we're going to let these cook for about five minutes or so.
We're going to let some of that moisture come out, and these will start to brown a little.
All right, these look good.
I'm going to add a little bit of tomato paste.
And some oregano.
Gotta little stir.
We're not going to do what we often do, which is brown this tomato paste for this one.
We want that fresher tomato flavor in this recipe.
So it's just going to cook it a little bit.
And now we can add those grated tomatoes from earlier.
So what we've also done here is we cooked those meatballs in here, so we've got a lot of that meaty flavor in this, too.
So it's going to add a lot of complexity to this sauce, which is going to cook in the oven.
So we'll just let this simmer for about four minutes or so.
We just want it to slightly thicken.
So this has thickened nicely.
We can add those meatballs and I'm going to take it off the heat.
And if you would grab those and start loading them in.
- I'm using my fingers.
I just want you to know.
- That's probably smart.
One thing you definitely don't want to use here are tongs.
These are, as you saw when we flipped them over, super delicate meatballs.
If you tried to squeeze that with a pair of tongs, they would just completely disintegrate.
Ooh, I like the arrangement.
- Just like a chrysanthemum flower, so pretty.
- So these are going to go into a 375 degree oven for about 15 minutes or so.
Best way to test these is with an instant read thermometer.
It should be about 160 degrees on that.
If you don't have one, that's fine.
Just cut one in half as a sacrificial lamb.
Just make sure it's cooked through.
- Okay.
- All right, Chris, these are just out of the oven.
You can see that sauce has really concentrated there.
It smells really good.
Can smell all of those herbs and spices in there.
Since it's been in the oven, I always remind everybody put something on here... - Good point.
- ...to remind you that the handle is very hot.
We went to the Manousakis Winery there, and they served this with a bunch of other little things.
Now if you wanted to serve it as kind of a main meal, you could serve it alongside some rice or orzo tossed with a little bit of lemon juice, and fresh herbs, it would be really nice alongside this.
I'm going to add some of those fresh herbs from earlier-- parsley and mint.
Smells amazing.
All right, serve up some meatballs.
- So this is really across the Middle East.
They're kofta too, right?
- Sure.
- I mean, essentially, right?
- Yeah.
I'll hand that one to you.
- Thank you.
- Would you like a piece of flatbread to go with?
- I would.
Thank you.
They're tender.
- They're very tender.
- Mm!
Man, are those good!
They're tender, they're light, obviously has nice herb flavor.
I wouldn't say every culture in the world has meatballs, but most of them do.
- Many do.
Yeah.
- This is definitely the top of the list there.
- So that sauce is so great.
We made it with those fresh tomatoes and that grated onion.
Thank you for all of your hard work on that.
Really, really nice and concentrated flavor from those tomatoes.
- So great meatballs in tomato sauce from our trip to Crete.
Fresh flavor, very tender, easy to make.
I'm going to put this on my Tuesday night rotation.
- As you should.
- Yes, and my kids will like it, too.
Thank you, Lynn.
- You're welcome.
♪ ♪ - When we visited Crete, we went to the Manousakis Winery and had phenomenal Greek-style baked beans.
So as soon as we got home, we wanted to recreate that dish.
Recreating that dish is not as easy as you'd think, because in Greece, they're using the gigantes bean, which is a bit larger and often mistaken for a lima bean.
In this recipe, we're actually using Great Northern beans.
And so Great Northern beans are a little bit smaller and they cook more evenly than their cousin, the cannellini bean.
So last night, I soaked a pound of beans with a little bit of salt, just so I'd have it ready here for you all.
So I'm going to take my soaked beans... and I'm going to combine it with the water.
I'm also going to add a little bit of bay leaf.
About two.
And some crushed red chili flake.
And now your beans should already be salted, so you don't want to add salt to this water.
Just make sure that you rinse off your pre-soaked beans really well before they end up in the pot.
Now, I'm going to bring this up to a medium boil.
This recipe is great because it doesn't require a lot of hands-on time, but it really makes for a hearty meal.
Give it a little stir so everything distributes well.
Now I just wait for bubbles.
Now, remember, if you are using the gigantes beans, you're going to want it to cook a bit longer just to make sure that your beans are fully cooked through and tender.
So we're getting a little bit of action in our pot.
Just going to let these come up to that medium boil.
And when that happens, I'm going to cover it, and take it to our oven.
So now that my beans are in my preheated oven, I'm going to let them cook for a bit.
And while that's going on, I'm going to grate up my vegetables.
So I've got some grated onion, carrot, and celery here.
You want to make sure to discard the strings when you're grating the celery.
And I'm about to grate up some zucchini.
So it is tempting to use a food processor here.
You don't want to do that because grating it by hand is going to release so much more of the flavor and the oils and all the good stuff in your vegetables.
And besides, this is how they did it in Crete, so might as well do it the right way, right?
And we're just going to grate this down to the stem.
As you're getting close to the end make sure to watch your hands.
All righty, so I've got grated zucchini, and in a separate bowl, I'm going to work on my tomatoes.
Seems a little daunting to grate a tomato, but it's actually a really great way to make a beautiful sauce.
No need to rinse the grater off between.
We can use all the extra vegetable love we can get.
So I'm going to use the large sides on my box grater, and I'm going to grate these with the flesh side down until it reaches the skin.
And go slow if you're nervous here, you don't want a piece of anything other than tomato in your final product.
I'm just grating it down to the skin.
So now we've got our tomatoes grated.
I use the small holes on my grater to grate up a little bit of garlic as well.
And then I'm going to combine my grated carrots, celery, and onion with my zucchini to add to my beans.
So I just grabbed my beans out of the oven and put them into this nine by 13 casserole dish.
You want something that's either glass, bake-safe, so we can finish off this dish.
I'm going to go ahead and pluck out my bay leaves because they've already given us all the flavor that we're going to get from them, and I don't think I want to bite into a big old bay leaf bite, so remove those.
I'm using the same pan.
Didn't have to wash it out or anything.
I'm going to go ahead and add about three tablespoons of oil to it.
All righty.
I'm going to put this up on medium heat.
Our oil is heating up to a nice little shimmer now, so I'm going to tip my veg in.
Not the tomatoes yet, just these vegetables so far.
All right, so I'm going to let these cook for about two to three minutes, uncovered, just to get some of the liquid out.
To these vegetables, I'm going to add about a teaspoon and a half of salt.
Now we just let them cook for a little bit.
So I'm going to let these cook for about two to three minutes, and then I'm going to cover the Dutch oven.
Now, the reason I'm doing that is because I want my vegetables to cook but not brown, so I want to retain some of that moisture.
So it's about ready for a cover.
Here we go.
Let these chill out for about eight to ten minutes.
You can poke in and check and stir occasionally.
All righty, so our vegetables have been cooking for about seven to eight minutes now.
They're a little bit softer, and they are marrying well all together.
So to this, I'm going to go ahead and add my grated garlic, and let that cook for about 30 or 40 seconds.
Now that the garlic is in there, I'm going to go ahead and add my tomato paste, and this is one of those moments where you don't need to be scared if your tomato paste is sticking to the bottom of the pan, because that is what you want.
You want to make sure that this gets to brown a little bit to add some more flavor to our dish.
All right, now we're getting some more of what we're looking for.
So we got a little additional color on our tomato paste from it cooking up, and now is the time that we add our grated tomatoes.
Also going to add just a little bit of oregano for flavor.
Season it up.
And a teaspoon of black pepper.
So we are going to stir up all of our ingredients and let it cook until we get a couple of shades darker before we add our tomato sauce to our beans.
So these have been cooking for a couple of minutes.
The sauce is thickening up nicely, so I'm going to turn off my heat, and add it to my beans.
So I'm just spooning the tomato sauce in over the beans that I cooked earlier and saved in the casserole dish.
All righty.
Let me stir this in first.
Gosh, that smells good.
So now that I've added my tomato sauce and combined it with my beans, we are going to bake this off for about 35 to 40 minutes, or until the top gets this nice little crust.
So let's take this over to the oven.
So I just grabbed these out of my oven.
You can see that there is a nice little crust going.
It was bubbling on the sides right when I took it out.
I did let it cool for about ten minutes on a wire rack just to make sure I could handle the beans.
So I'm going to spoon a little bit out for myself here.
And you can serve this as a side or a main, it's hearty enough to just go with, you know, a little bit of bread, but you can serve it alongside fish, pork, whatever you see fit.
You can see all the vegetables have kind of cooked down into this tomato sauce and it smells phenomenal.
So, before I take a bite, I want to add just a little bit more good olive oil.
All righty, time to taste.
The tomatoes are still bright in here, but there's a lot of really well-built flavors, and the beans are perfectly tender.
So, inspired by our trip to Crete, this is our Greek-style baked white beans with tomato sauce.
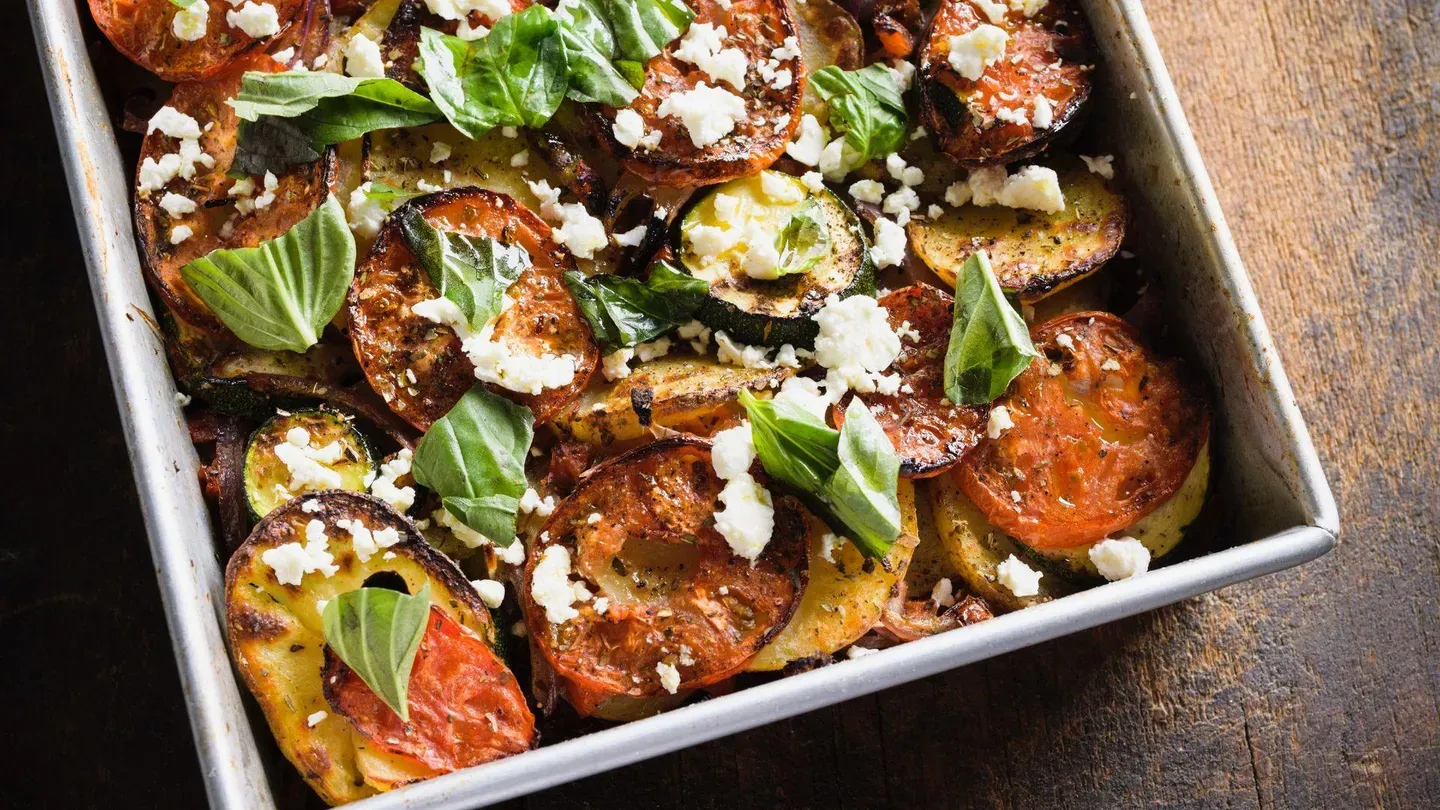
♪ ♪ - We're making an exceptionally easy vegetable dish from Greece called briam.
It's an assortment of vegetables mixed together with a little garlic, a little dried oregano, and a generous amount of olive oil.
Then it's baked in the oven until it's rich and jammy.
Now, the presence of all that olive oil is what makes this dish a lathera style, because that word refers to the oil itself.
Most briams have a little bit of potato in them, and ours does, too.
But the real highlight of this dish are the summer vegetables like zucchini and tomatoes, which bring brightness to the whole flavor.
We're going to start with the potatoes because they take a little bit longer to cook.
I've already cut the potatoes into quarter-inch-thick slices and they are unpeeled.
Put them in a bowl with about a quarter cup of water to create steam inside the bowl, cover the bowl, and then microwave them on high for about ten minutes.
Okay, so our potatoes are very hot, and we need to pour off that water we added to them.
So I'm going to hold them back.
There we go.
It's usually not a lot of water because the potatoes have absorbed some of the water.
You want the potatoes to be almost tender.
Not quite, but just about there-- al dente, you could say.
Okay, we'll set this aside, and then we'll prep our vegetables.
Now, we have six plum tomatoes.
You want to think about using plum tomatoes because they have a little less moisture in them than those big, juicy beefsteak tomatoes do.
And these work better in the briam.
We've cut four of them into little cubes, and we'll add those to the potatoes.
And then we will slice our zucchini just a little thicker than the potato.
We're using two medium zucchini here, but if you have extra large or extra small zucchini, just use a little more or less.
And we're going to add this to the bowl as well.
Okay, so we've got all our vegetables together in this bowl.
We're going to add one red onion, sliced, few cloves of sliced garlic, little salt and pepper, of course, and some dried oregano.
Now we're going to mix the vegetables with all of this.
And remember the olive oil, quarter cup of olive oil.
Now, the first time you make this, this may seem like too much olive oil, but it's really the exact right amount.
The vegetables absorb the olive oil, and what it does, it doesn't make them heavy and oily.
It actually enriches their flavor and helps them become really jammy sweet as they cook down, and it helps keep their moisture as well.
Okay, you want to mix this all together very well.
Let the olive oil coat all those vegetables.
You know, the way I remember the word lathera, which is the style of cooking vegetables in olive oil, is that you're lathering everything with olive oil.
All right, so now we'll simply transfer this to a baking dish, and our recipe puts this under the broiler for the last five minutes of cooking.
So you want to make sure your baking dish is broiler safe.
If all you have is a glass baking dish, that's okay, just skip that broiler part.
So the finishing touch before this goes into the oven is those last two plum tomatoes.
Those we'll slice about a quarter-inch thick.
The tomatoes on top serve two purposes.
Those slices look beautiful spread out over the top, and also they keep the whole dish very moist inside.
Okay, just distribute those evenly over the top.
Give a last little bit of salt and pepper so the tomatoes get some seasoning on them, A little bit of dried oregano, and, of course, more olive oil.
So we've preheated the oven to 475 degrees.
You want a nice, hot oven.
We're doing sort of a bake-roast combination here.
This will go into the oven for about 30 minutes.
At that time, the vegetables will have cooked down, they will all be evenly soft and rich and moist.
And then we will put it under the broiler for about five minutes to just crisp the edges of those potatoes and tomatoes.
♪ ♪ Ooh... just took this out of the broiler.
You can see the little brown edges around the tomatoes, and the zucchini, and some of the potato got a nice little singe on it, too.
Now we're going to sprinkle over a little bit of feta cheese.
Feta is a Greek cheese that has a salty, briny quality to it.
We're going to sprinkle it over while this is hot, so the cheese gets just a little soft and melty.
It's not a stretchy, melty cheese.
It's a soft, creamy cheese.
And this is one of those instances where it's worth getting a really good quality feta.
Avoid those pre-crumbled pieces that you can get in a little tub and buy a block of feta.
So, once the cheese goes on top, let it sit for about ten minutes to give the cheese a chance to get warm and soft.
Now, this is one of those dishes, if you're not sold already, you can make this far in advance and let it sit until you're ready to serve, because it's just as good at room temperature as it is warm.
It's even good cold the next day, too.
But once it comes out of the oven and you have the feta cheese on it, it will wait for you.
All right, this has been sitting for ten minutes.
The feta cheese is soft and melty, and now we're ready to serve.
And right before we do so, we'll take some fresh basil and just tear it into pieces right over the top, which brings out the fresh, herbal, slightly licoricey flavors within it.
And then, of course, a good briam is going to be lathered with more olive oil.
So we'll just sprinkle that over the top.
You know, olive oil when it's baked in the oven, and then fresh olive oil has different qualities to its flavor.
It'll maintain more of its fruitiness right now, whereas in the oven it gets a deeper, richer flavor.
Plus it mingles with all the juices of the vegetables.
And what you've got is an incredibly soft, delicious vegetable dish.
So we are ready to serve.
It's a very casual sort of dish.
Serve it very casually as well.
Just scoop it up and place it on your plate or a bowl.
Get some of the juices in the bottom and drizzle those on top.
And this is a briam-- Greek baked vegetables.
Mm...
This is one of my favorite combinations.
Baked tomatoes, zucchini, onions, and that warm feta on top.
Oh, I could eat this every day, literally.
Mm, this is so delicious.
You can get this recipe and all recipes from this season of Milk Street at MilkStreetTV.com.
- All episodes and recipes from this season of Milk Street Television are available for free at our website: MilkStreetTV.com.
Please access our content, including our step-by-step recipe videos, from your smartphone, your tablet, or your computer.
- The new Milk Street Cookbook is now available and includes every recipe from our TV show.
From fried shrimp tacos and Thai-style vegetable stir-fry, to Mexican chicken soup and Swedish cardamom buns, the Milk Street Cookbook offers bolder, fresher, simpler recipes.
Order your copy of the Milk Street Cookbook for $27, 40% less than the cover price, and receive a Milk Street tote with your order at no additional charge.
Call 855-MILK-177 or order online.
- Funding for this series was provided by the following.
- That meal.
You sautéed, you seared, and you served, cooking with All-Clad, bonded cookware designed, engineered, and assembled in the U.S.A. for over 50 years.
All-Clad: for all your kitchen adventures.
♪ ♪ ♪ ♪


Support for PBS provided by:
Christopher Kimball’s Milk Street Television is presented by your local public television station.
Distributed nationally by American Public Television